How to Make an Explainer Video Without Experience
This post contains affiliate links; I may earn a commission at no extra cost to you.
AI disclosure: this guide was drafted with help from AI writing tools and reviewed and edited by PickSavvy Lab. Product details come from each vendor's sales page.
Most people who say "I can't make videos" are really saying one of three things: I don't know what to say, I don't know what it should look like, or I don't want to be on camera. An explainer video solves all three. It is short, it follows a fixed shape, and nobody has to see your face.
This guide walks you through a beginner method that works with almost any editor, including free ones. Near the end I'll mention one tool that bundles the pieces together, but you can follow every step without buying anything.
What an explainer video actually is
An explainer is a 30 to 90 second video that answers one question for one kind of viewer: "What is this, and why should I care?" It usually uses animation, icons, moving text or simple illustrations instead of live footage. That is exactly why it suits beginners. You are arranging pieces, not directing actors.
The format has a predictable skeleton:
- Problem — the situation your viewer is stuck in.
- Solution — what you offer, in one sentence.
- How it works — two or three simple steps.
- Proof or detail — one concrete reason to believe you.
- Call to action — the one thing to do next.
If you remember nothing else from this post, remember those five boxes. Every step below just fills them in.
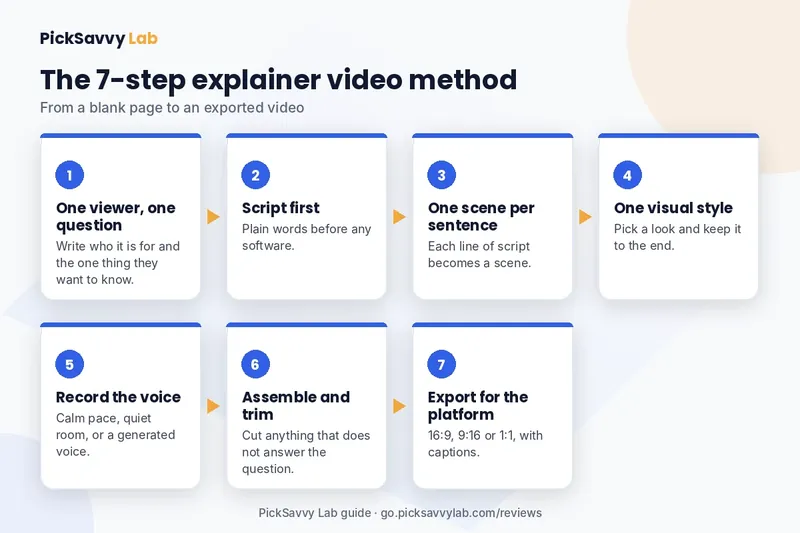
Step 1: Pick one viewer and one question
Beginners often try to explain everything at once. Instead, write one line at the top of a blank page:
"This video is for [one type of person] who wants to know [one question]."
For example: "This video is for new dog owners who want to know how our walking service books a time." Now you have a filter. Anything that doesn't answer that question gets cut.
Step 2: Write the script before you open any software
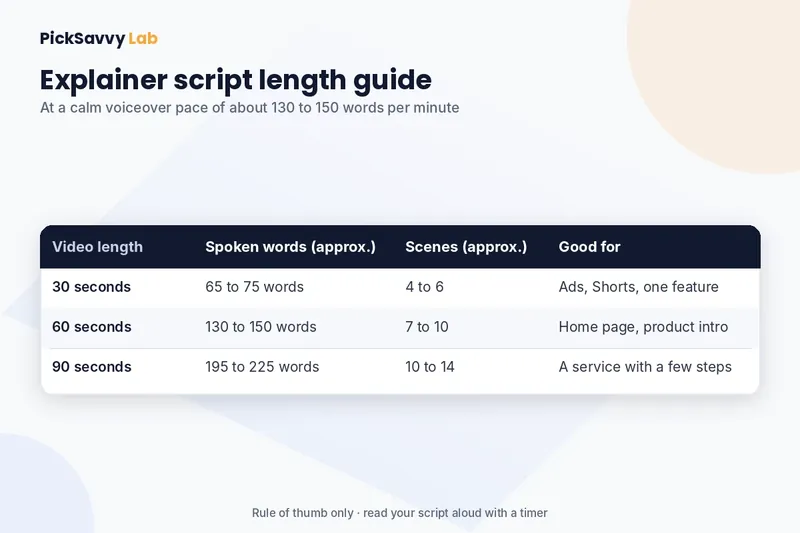
Software is distracting. Write the words first, in plain text. A useful rule of thumb is that most people speak about 130 to 150 words per minute in a calm voiceover, so a 60-second explainer lands somewhere around 130 to 150 words. Read it aloud with a timer to check yours.
A fill-in template you can copy:
- Problem: "Ever tried to ___ and ended up ___?"
- Solution: "___ helps you ___ without ___."
- How it works: "Just ___, then ___, and you're done."
- Proof/detail: "It ___ so you don't have to ___."
- Call to action: "Visit ___ to ___."
Keep sentences short. If a sentence has a comma and an "and," it can probably become two sentences.
Step 3: Turn each sentence into a scene
Take your script and give every sentence its own row. Next to each row, write what the viewer sees. You don't need drawing skills; stick figures and words like "icon of a calendar" are fine. This is your storyboard.
| Script line | On screen |
|---|---|
| Problem line | Frustrated character, clock spinning |
| Solution line | Your logo, product name in big text |
| How it works | 3 icons appearing one by one |
| Proof/detail | One number or feature, large |
| Call to action | Website address, button shape |
Five to eight scenes is plenty for a first video.
Step 4: Choose a visual style and stick to it
Pick one style and don't mix it halfway through:
- Whiteboard — a hand "draws" each scene. Friendly and good for teaching.
- Flat motion graphics — icons and shapes sliding in. Clean and modern.
- Kinetic text — mostly animated words. The easiest to do well.
Kinetic text is the most forgiving choice for a first attempt. If your words are strong, a video that is mostly moving text still works.
Also choose two colors and one font family before you start. Consistency is what makes a beginner's video look planned.
Step 5: Record or generate the voiceover
You have three options:
- Record yourself on a phone in a quiet room with soft furnishings (a closet full of clothes works surprisingly well). Hold the phone about a hand's width from your mouth, slightly to the side.
- Use a text-to-speech voice. Many editors include one. Listen for odd pronunciation of brand names and respell them phonetically if needed.
- Skip the voice and use on-screen text plus music. This is fine for social feeds where many people watch with the sound off.
Record the voice before you animate, then time your scenes to the audio. Animating first and squeezing the voice in later is the most common beginner headache.
Step 6: Assemble, then trim ruthlessly
Lay your scenes over the voiceover, add a quiet music track (well under the voice), and watch it start to finish. Then cut:
- Any scene that holds for more than about 5 seconds with nothing changing.
- Any transition that draws attention to itself.
- Any sentence the viewer didn't need to answer your one question.
Show it to one person who doesn't know your business. Ask them, "What is this, and what should you do next?" If they can't answer both, fix the script, not the animation.
Step 7: Export for where it will live
- Website or YouTube: 16:9 (wide).
- Shorts, Reels, Stories: 9:16 (vertical). Keep text away from the bottom edge where the app's buttons sit.
- Feeds that show squares: 1:1.
Add captions. They help accessibility and help anyone watching on mute.
Where Explaindio 5 AI fits
If you follow the steps above in a general video editor, the slowest parts are usually Step 3 and Step 4: finding scenes and animation that look consistent. That is the gap template-based animation tools try to fill.
Explaindio 5 AI is one of them. According to its sales page, it includes more than 2,200 animated templates, five "Video Blueprints," whiteboard drawings, moving text and motion graphics, with stock photos and videos available in the editor. The page also says rendering can happen on Explaindio's servers or for free locally in an included desktop app for Windows 10+, macOS 13 Ventura+ and 64-bit Linux.
This version has a specific angle that's worth knowing before you look at it: the sales page builds it around pitching explainer videos to local businesses. It describes a business finder (search by business type and town, up to 50 results per search), a website scan that flags sites with no video, a one-click sample video built from a business's own website on a watermarked preview page, and an email writer. You read and send each email yourself; the page is clear that it does not send emails for you.
So it suits two kinds of beginner: someone who wants a template library for their own explainers, and someone who wants to try offering explainer videos to local businesses as a freelancer.
Honest pros and cons (based on the sales page)
What looks useful
- One-time payment with no monthly fee on the front-end plan, and no API keys to connect.
- A large template library, which directly helps with the "what should it look like" problem.
- A desktop app with free local rendering is included.
- Commercial license and a 30-day money-back guarantee.
What to know first
- 800 credits are included, which the page says covers about 60 sample videos; more needs credit packs or an upgrade.
- One-click samples are narrated in English only, with four US English voices.
- A thin website gives a thin sample, and businesses with no website can't get one.
- Outreach is manual, one email at a time.
- Optional upgrades are offered after checkout.
Who should skip it
If you only need one simple video, a free editor and the seven steps above will get you there. Skip it too if you want outreach that runs on autopilot, need sample narration in another language, or plan to edit mainly on a phone. And nobody should buy it expecting guaranteed clients; the vendor doesn't promise that and neither do I.
Pricing
As listed on the sales page when checked Nov 7, 2026: a one-time front-end payment, with the page saying the price rises as more people buy, up to $47. Check the current price at checkout, since that page shows the final amount. Upgrades (Pro, Fix-It Pack, Agency, Done-For-You Leads, Bundle) are optional.
FAQ
How long should my first explainer video be? Aim for 45 to 60 seconds. It's long enough for the five-part structure and short enough that you'll actually finish it.
Do I need to draw to make an explainer video? No. Kinetic text, icons and templates cover most needs. Your storyboard can be stick figures and words.
Should I use my own voice or an AI voice? Either works. Your own voice builds trust for a personal brand; a text-to-speech voice is faster and easier to redo. Whatever you pick, record it before animating.
What's the most common beginner mistake? Trying to explain too much. One viewer, one question, one call to action.
Can I make explainer videos for other businesses? Yes, many freelancers do. Make sure any tool you use includes a commercial license, and be upfront with clients about what's template-based.
Next step
If you want to see the full breakdown of features, limits and the guarantee before deciding, read our Explaindio 5 AI breakdown on PickSavvy Lab. To compare it with the other tools we cover, visit the PickSavvy Lab home page.
Either way, write your one-line viewer sentence today. That's the hardest part, and it's free.
Free: Holiday Content Kit (email required, not an affiliate link)
Affiliate disclosure & privacy policy · About · Free Holiday Content Kit